Static reading edition · s10-01
Understand the interactive CLI and scripted runs
Choose the terminal workflow that fits the task and confirm its environment before running work.
Understand the approach
The command-line interface lets Codex work from a terminal against local project files. Running codex opens an interactive terminal user interface, often shortened to TUI. You can give an initial request and continue with follow-ups, inspect commands and steer the task. The desktop app is still the default learning surface for this course; use the CLI when terminal navigation or repeatable execution makes the work easier.
A scripted run uses codex exec rather than Claude’s print-mode flags. It accepts a task and finishes without opening the interactive conversation UI. This is useful for a bounded summary or structured extraction. It is not automatically safe because it lacks a chat window: the working directory, authentication, permissions and available tools still determine what the agent can do. Begin with a read-only task that produces an inspectable result.
Install through an option documented on the official Codex CLI page if the CLI is absent, using your normal software-approval process. The current guide includes standalone installation for supported operating systems and package-manager alternatives. This course does not run installation for you. If the CLI is already available, check its version and help rather than installing another copy. Multiple installations can make documentation and observed behavior disagree.
Interactive work and scripted work have different interfaces

Use the interactive CLI for an ongoing conversation. Use codex exec for a bounded non-interactive task with an explicit output contract. Both require the correct project scope and result verification.
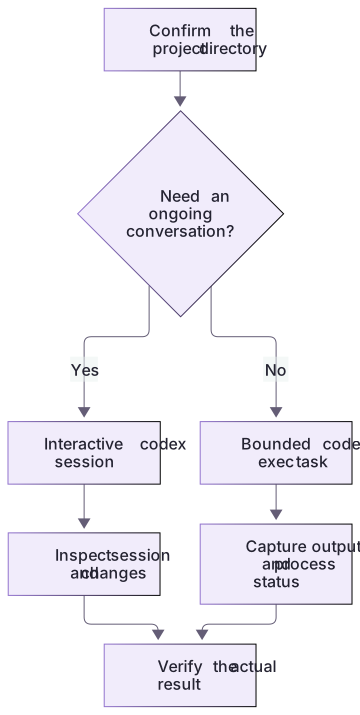
Compare one-shot execution with a continuing app chat
The dry-run planner prints run:false, the exact red project path and a fixed codex exec argument array. It launches no child. Inspect the directory and output artifacts before an optional authenticated task: events.jsonl, stderr.txt and final.json, accompanied by process.json.
The app chat can be steered with follow-ups. A one-shot process needs enough input and a verification contract up front. The optional runner captures process exit separately from event contents; the local exercise never claims that a Codex account or model ran.
A terminal is another project surface
Your shell’s current directory matters just as much as the folder selected in the app. Quote paths containing spaces and confirm whether commands run on the local computer, a remote host or a container. If a scripted run refuses a non-Git folder, use an appropriate disposable Git project rather than disabling repository checks casually. An environment mismatch should be diagnosed before model settings are changed.
About your environment
Checked 21 October 2026. Feature availability varies by client and host.
Try it step by step
- Open the fictional red project in the app and identify its actual source facts.
- Inspect the dry-run plan: directory, fixed argument array and new output artifacts; no Codex child starts.
- Compare app follow-up interaction with the one-shot prompt and process boundary.
- If independently choosing an existing authenticated CLI, inspect help first and record actual output; otherwise mark the client run unexecuted.
A useful starting example
Illustration · adapt before use.
node labs/cli-pipeline/capture-codex.cjs --project redcodex --version
codex --help
codex --sandbox read-only "Read README.md and explain this scratch project without editing it."
codex exec --sandbox read-only "Read README.md and list missing setup information. Do not edit files."Understand the process loop before a live CLI run
Use the app to inspect and run the local synthetic producer; no Codex CLI account or installation is required.
node labs/cli-pipeline/run-pipeline.cjs success
node labs/cli-pipeline/run-pipeline.cjs incompletesuccess → Outcome: completed, exit 0
incomplete → Outcome: incomplete, exit 4
Both runs are labelled synthetic and use no model service.The offline lab makes process output and completion observable before an optional authenticated codex exec invocation.
Your turn
Open the lab in the Codex app, inspect the red fixture README and ask a follow-up about its missing deployment URL. Generate the dry-run CLI plan and compare its one-shot prompt, resolved directory, arguments and output files with the ongoing app conversation. If you separately choose an existing authenticated CLI, execute the optional read-only capture and record its actual result; otherwise mark it unrun.
Try the exercise before opening its reference answer. Use a disposable practice folder.
Offline CLI event pipeline
Extract into a new practice folder and keep the included labs folder. Run these commands from that extraction root, or from the course folder, using an existing Node.js installation.
- Command 1 text
node labs/cli-pipeline/capture-codex.cjs --project redCheck: run:false; resolved red source path, fixed read-only arguments and output plan. No authenticated child starts.
- Command 2 text
node labs/cli-pipeline/capture-codex.cjs --project blueCheck: run:false; a distinct blue path, project name and documented check.
Commands are relative to the course folder. Open the lab in the Codex app first. Lesson-specific artifacts separate offline execution from optional authenticated CLI observations; a dry-run plan is not a live model result.
Check your result
- The installed executable and version are identified, with no unnecessary global installation or settings change.
- Both tasks inspect the same intended project and produce source-grounded answers.
- You can explain why interactive codex and codex exec differ from each other and from desktop navigation.
Reference answer & rubric Try the exercise before opening
Start with the app and the local process contract, then compare interactive versus scripted Codex only when the client already exists.
- Open the lab in the Codex app and read the synthetic-fixture declaration.
- Run the two local cases and inspect both output and exit code.
- Explain how a one-shot process differs from an ongoing app chat.
- Compare the actual result with the lesson-specific answer key; record unrun client observations separately from executed local checks.
Check your understanding
Which entry point is intended for a bounded non-interactive Codex task?
- codex exec
- claude -p
- /new typed directly into PowerShell
Reveal the answer and explanation
Answer 1: codex exec
codex exec is the documented scripted entry point; the other examples belong to another product or to the interactive composer.
Take this quiz in the interactive lesson to save your answer in the browser.
When it does not work
The lab cannot find node.
Likely cause: The current terminal does not expose an existing Node runtime.
What to try: Use the host’s configured runtime or inspect the source and mark execution unrun; do not install implicitly.
The synthetic result is described as a live model answer.
Likely cause: Fixture execution and service execution were conflated.
What to try: Retain the synthetic label and separate the unperformed Codex step.
Common mistakes
- Using claude -p style flags in Codex without consulting the current command reference.
- Assuming an unattended run has no permission or verification requirements.
Source mapping & differences · different
Codex uses interactive codex and non-interactive codex exec; Claude print-mode flags and native-install instructions are not copied across products.
Source topic: Overview ↗Go to the source
Official documentation, checked 21 October 2026. Product names, controls and availability may vary with your version, platform or account.
Completion and quiz progress are saved
only in the interactive course.