Static reading edition · s01-01
Open Codex and complete a first read-only task
Choose the desktop, CLI or IDE surface, sign in, and verify the project before allowing edits.
Understand the approach
Codex is a coding agent that can inspect files, propose changes and run available tools. Begin with the desktop app when you want projects, chats and previews in one workspace. Current official documentation puts a Codex choice inside the ChatGPT desktop app; ordinary Chat or Work instructions are not automatically Codex instructions. A familiar chat box does not prove that the intended folder is open.
Download the desktop installer through the official download link in the app documentation, follow the normal operating-system installation flow, and sign in through the browser. Choose Codex, then open a disposable project folder. The CLI is a separate terminal client; the IDE extension works beside files in your editor. Local clients support ChatGPT sign-in and supported API-key authentication, with different billing and administration implications. Never paste a key into a practice prompt.
Your first success is a trustworthy description of the environment, not an ambitious generated application. A folder named codex-lab containing a short README is enough. Ask what files and tools are actually visible, then compare the answer with your own file browser. Missing access should be reported as missing. A model cannot verify a project merely from its name or from your account being signed in.
Choose a surface, then verify the same project

Choose the app, CLI, or IDE according to where you work. Each route converges on inspecting the actual folder and comparing README facts with the answer. Signing in alone does not prove project access.
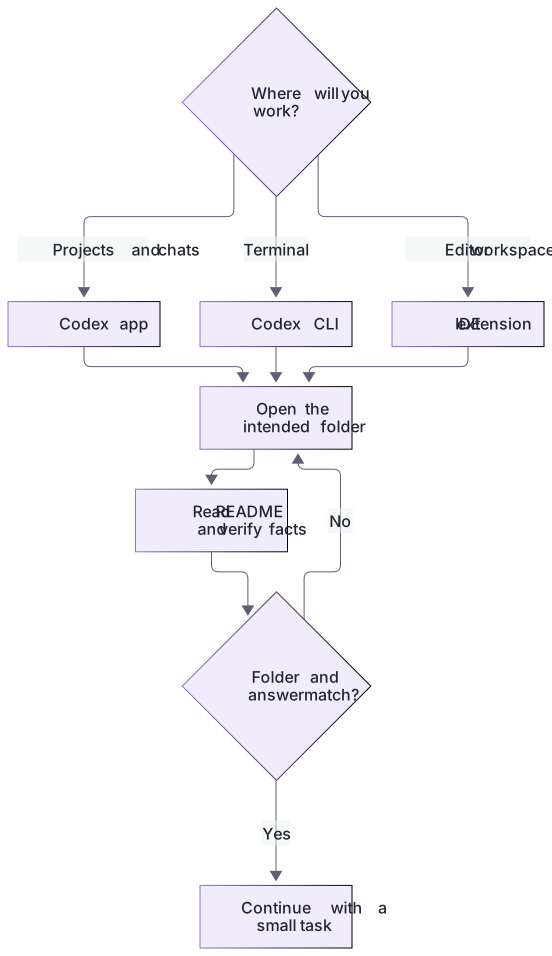
A first session with a factual answer key
The practice data contains n1, n2, n3 and n4. It is fictional local data; no deployment URL is supplied. README.md recommends npm test, but no package.json exists. A grounded answer distinguishes the project purpose and four records from that unsupported instruction. Do not install a package merely to make the sentence appear valid.
Read notes.json yourself after the response. If the reported directory differs from the returned temporary path, open the right project. A working sign-in proves neither that this folder is selected nor that its contents were inspected.
What comes next
Next, choose one small output such as a clearer getting-started document. Name its allowed path, preserve the README as a source, and open the saved result yourself. Installation, authentication, project access and successful delivery are separate milestones; identify which one failed when troubleshooting.
Four names you will encounter
A built-in control operates the client, such as opening status or review. A skill packages a repeated workflow in SKILL.md. A plugin distributes skills and tool connections. An MCP server exposes capabilities a client can discover. They are related, but a plugin or server name is not automatically a working slash command.
In the practice project, the README audit is an ordinary request first, then a local readme-check skill. The fictional ticket remains local data unless an actual available connection retrieves a record. Later stations cover plugin distribution and MCP setup; this first exercise establishes which kind of action you are using.
About your environment
Checked 21 October 2026. Feature availability varies by client and host.
Try it step by step
- Use the official app instructions for your operating system; if Codex is already installed, inspect it rather than reinstalling.
- Create or copy a harmless codex-lab folder with README.md and fictional notes; keep work documents outside the exercise.
- Choose Codex and open that folder. In CLI use the intended directory; in IDE confirm the workspace root.
- Send the read-only example, open the files it mentions, and correct any mismatch before authorizing a change.
A useful starting example
Illustration · adapt before use.
Read only: confirm the actual working directory. Read README.md, AGENTS.md and notes.json. Report the project purpose, the four note IDs and whether a deployment URL is documented. Inspect whether package.json exists before accepting the README test instruction. Do not edit or install anything.A first answer grounded in files
Open the returned Orbit Notes copy in the Codex app. This is an answer key derived from supplied files, not a captured model response.
README.md: fictional local note-search project
notes.json: n1, n2, n3, n4
Question: What is the deployment URL?Known: Orbit Notes has four fictional notes.
Unknown: no deployment URL is defined.
Working folder: verify the returned temporary path in the app.The correct result reports the source facts and keeps the undocumented URL unknown. The app must inspect the actual copy; the fixture name alone is not evidence of access.
Your turn
Create a fresh Orbit Notes copy with the lab command and open that exact path in Codex. Ask the first message, compare its four IDs with notes.json, and ask where the application is deployed. Pass only if it identifies the unsupported npm test instruction and reports the deployment address unknown.
Try the exercise before opening its reference answer. Use a disposable practice folder.
Orbit Notes project and recovery capstone
Extract into a new practice folder and keep the included labs folder. Run these commands from that extraction root, or from the course folder, using an existing Node.js installation.
- Command 1 text
node labs/project-workflow/create-workspace.cjsCheck: Returns a new owned temporary path. Open that exact copy in the app; the shipped starter stays broken.
- Command 2 text
node labs/project-workflow/verify-depth.cjsCheck: Runs two candidate implementations and recovery counterexamples in fresh copies. Reports paths, facts and preservation; live skill/instruction discovery remains a separate observation.
Follow this lesson’s specific walkthrough and compare its result with the answer key. Commands are relative to the course folder. The offline demonstration never claims a live Codex client loaded instructions, selected a skill or retrieved a connected record.
Check your result
- The reported working directory matches the folder you opened, rather than an unrelated parent or previous project.
- The summary accurately reflects all three facts and identifies the missing information without inventing an answer.
- You can explain why the desktop app, terminal CLI and editor extension require different navigation instructions.
Reference answer & rubric Try the exercise before opening
A successful first task establishes the actual folder and source facts, without pretending installation or access has been verified by the course.
- Open the freshly returned practice directory, not the parent course or a previously open project.
- Read README.md and notes.json; verify all four IDs and the fictional project purpose.
- Ask about deployment and confirm the answer says the URL is not documented.
- Compare the actual result with the lesson-specific answer key; record unrun client observations separately from executed local checks.
Check your understanding
Codex confidently summarizes a project you cannot find in the open folder. What is the next useful action?
- Ask it to build the full app anyway.
- Confirm the working directory and inspect the named files.
- Change to the most expensive model.
Reveal the answer and explanation
Answer 2: Confirm the working directory and inspect the named files.
The mismatch is an environment problem until the folder and evidence are confirmed. A different model does not establish access.
Take this quiz in the interactive lesson to save your answer in the browser.
When it does not work
The answer describes another project.
Likely cause: The previous workspace or a broad parent folder is still selected.
What to try: Open the returned practice folder and request a new file-based summary.
The answer supplies a deployment URL.
Likely cause: The model inferred a plausible fact without a source.
What to try: Ask for the exact source; remove the unsupported URL and retain the unknown.
Common mistakes
- Opening a broad personal folder and assuming every file inside belongs to this task.
- Treating successful sign-in or a polished answer as evidence that the agent inspected the correct project.
Source mapping & differences · different
The source begins with Claude slash commands. This Codex introduction first establishes the app/CLI/IDE surface, account and project, so command examples have a real operating context.
Source topic: Overview ↗Go to the source
Official documentation, checked 21 October 2026. Product names, controls and availability may vary with your version, platform or account.
Completion and quiz progress are saved
only in the interactive course.